Archive

Tag Archives: Cabinetry

The Corona Chronicles-like everyone else -work here at Handyman Headquarters in downtown
Raleigh sputtered along in 3/4 or even 1/4 time during the dreary Spring Incarceration of 2020.

Long hours alone surrounded by sawdust and powertools punctuated by explorations of
Buckminster Fuller’s Geodesic Dome for the Cabin Fever Crowd (CLICK LINK)

and, of course, the ever popular Gatorade Snaptop Canister made from 2 recycled Gatorade plastic bottles.(CLICK LINK)

Howsomeever, there were and continue to be JOBSHOP PROJECTS!

Similar to jobshop projects from the recent past

(CLICK LINK)(CLICK LINK) (CLICK LINK) (CLICK LINK)(CLICK LINK)(CLICK LINK)(CLICK LINK)

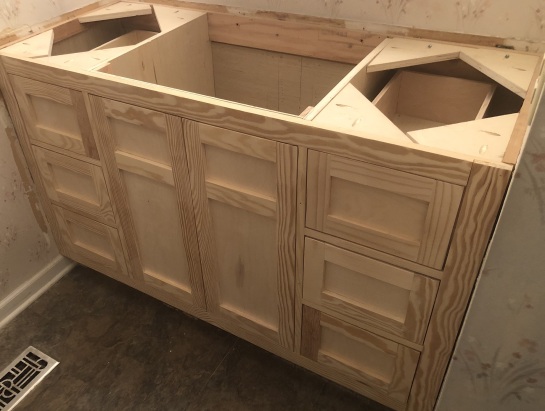
some part of this custom bathroom vanity lay on the work bench through most of March, April and May.

Big pieces of lumber and plywood cut into small pieces of lumber and plywood (Step 1)

Said small pieces of lumber and plywood reassembled into other larger pieces of lumber and plywood. (Step 2)

Hardware and fixtures assembled and installed! (Step 3)

Finally, the completely assembled unit at the jobsite!

If your kitchen cabinet door or any custom cabinet door implodes for some reason or other DO NOT PANIC,DO NOT DESPAIR, DO NOT ACT IN HASTE!

The best thing you can do is carefully tape all the pieces in place and wait for me or some FIXIT type to arrive and carefully remove all the pieces and splinters to better assemble and reattach everything back together.
This door was reattached and reassembled with no sign of damage because the homeowner was careful not to add to the initial injury.

All the pieces fit together and complete recovery was the end result.

Another example of careful repair work can be found here:CLICK LINK

More people should try this. Suppose you have a beautiful scrap slab of butcher block counter top.

Now you need legs to convert the slab to a functional table.

You COULD buy or make some legs from the local lumberyard. Very expensive! Click link

OR you could use a little ingenuity to convert salvage legs from a discarded table
to fit the top you already have.

Flea markets, yard sales, thrift stores and (sadly) even the local dump overflow with
genuine factory grade hardwood legs from yesteryear which can be repurposed to make a
beautiful base for your new table top.

Here is one example in four easy steps:

Step #1

Funky beat up particle board table top attached to scuzzy factory table legs at the local thrift
shop. $40.00 out the door!

Step #2

Boy, did these legs clean up nicely! The finish surface underneath the gunk was almost
pristine. What a gem! Obviously they are the wrong width and length to fit the new table
top, so a few cuts and fill wood will complete the reattachment to their new home.

Step #3

Good to go! The new assembly is showroom shiny.

Step #4

A finish coat for the butcher block and this table fits perfectly with the kitchen decor!

Come the Apocalypse, this hand held auger bit drill (aka “brace”) will do the
same work for humanity all hand powered tools have done for centuries.

This one, of course, is not exactly your grandfathers brace and bit since
the bit is the innovative modern adjustable version introduced sometime
in the second half of the 20th Century.

Any size hole up to 3 inches with just a turn of the adjustment screw! Prior
to that most carpenters carried an entire cloth tool roll filled with every size
needed on the job to make holes from 1/4 inch up to a gargantuan 1 1/4 inch diameter.

For larger holes an additional tool roll of large hole augers would need to find
space in the toolbox as well.

I used this particular combination brace and bit all through the late 1970’s through
the middle 1990’s- mostly to bore knob and lock holes in the solid fir doors commonly
available at the time.

Before battery operated drills with individually sized hole saws the trusty brace and bit
was the go-to hole making tool of the day.

Of course, in the 21st century most doors come from the factory with knob and lock holes
pre-drilled so even the need to cut holes onsite is uncommon.

Nevertheless, as recently as a few weeks ago I needed to make a special retro sized hole
and none of the many hole saws or spade bits in my tool box could quite do the job.

So maybe the day of the classic brace and bit is not yet gone. They are still for sale
(new!) online. Go figure.

So to install a tipout sponge tray is not a difficult job with a new kitchen cabinet.

Plenty of space to swing tools around and attach screws without counter tops and sinks
in place to block access to screws and hardware.

Howsomeever, retrofit a tipout sponge tray in an existing cabinet and there is a
completely different job with completely different access and space requirements.

In spite of all the modern new ratchet gizmos and power drill attachments only one tool
still really works in that cramped crowded workspace- the good ole fashioned handheld
offset screwdriver.

Yes, I bought a set back in the good ole days and every so often, they still come in handy!

A thing of beauty and a joy for ever, get yours today! You never know when you will need one!

Walmart still sells them! CLICK LINK

CurioShelf2

PlateText2

Plate rails or knickknack/ bric a brac shelves do not
need to be fancy or elaborate to display favorite
curios. A plain board held in place with hidden
pins can do the job just as well as the more
complicated variety of overhead display shelf.

Drill matching holes in the edge of a 3/4 or 4/4 board and
a suitable wall location and insert (steel) dowels to hold
everything in place!

(Now you know why it is important to be able to cut steel pins
to size! See LINK HERE)

A previous video (CLICK LINK HERE) demonstrated how any saw with a depth of cut adjustment – handheld circular saw, table saw or radial arm saw — can be used to cut the ever popular quick and strong half lap joint in the field or in the shop.

This video demonstrates a more refined two step process to quickly and precisely cut a large number of half lap joints with a pre-made plywood guide or jig for use with a table saw.

Assembled in just a few minutes from scrap lumber the jig can be used immediately and saved for future projects which would include both lap joints and tenon sections for mortise and tenon joints.

To see the entire archive of Blog Video Posts CLICK THIS LINK