So factory replacement sashes are adrift in a blizzard of bureaucratic paperwork and the damaged sash on the house is literally melting into mush minute by minute in plain sight.
What to do? Board up the window for an interminable interim? Or find a tricky way to stabilize the damaged section? Choice the second was not that difficult. Ordinary stock off-the -shelf moulding ripped down to size and overlayed on solid sash pieces protected and stabilized the damaged part.
The channel formed by the overlay was filled with old timey glazing compound for an attractive and robust repair.
When the replacement sash finally arrives the damaged sash can be removed in one piece and the new sash dropped into place.
A unique and inexpensive solution for a somewhat intractable problem!
I agree office chairs take quite a beating and frequently die,but most of the
ones I see by the side of the road have perfectly functional rolling bases which
can make an excellent mobile shop tool caddy.
Just remove the seat and use the same bolt holes for your storage platform for whatever you need, a box or flat platform or storage drawer to access frequently used tools.
Another fine idea from the Skunkwerks brain trust.
The new appliance is just slightly larger than the old range top. Approximately one half inch must be trimmed from each side. The cuts must be neat, precise and accurate for best visual results.
Hardly a job for a Sawzall ,jig saw, circular saw or router. The Oscillating Multi-Tool however, is perfect. With a straight edge guide clamped in place the little finish tool slowly leaves a perfect kerf.
Gutters and downspouts frequently clog and the market for innovations seems
unlimited in the ongoing war between the need to divert rain water from roof to
ground and the reality said water will carry sufficient debris to clog
any channel designed for such efficient diversion.
The residential downspout market has a number of gizmos designed
to clear any disruption to the smooth passage of water from point A to B. CLICK LINK HERE
Commercial fixtures, on the other hand, attempt to dominate through sheer size.
A 6 inch by 6 inch box downspout connected to a well designed roof scupper will
easily swallow many oversized leaves, tree limbs and detritus without so much
as a hiccup and discharge them to the ground.
Howsomeever, even the largest commercial downspout can run afoul of troublesome
blockage sufficient to need manual cleaning. So I was surprised to learn the
number of after market hatch type gizmos are rare and hard to find.
But no problem. A 6 inch by 6 inch metal box downspout is exactly the same size
as a 6 inch by 6 inch electrical PVC junction box which can be easily
modified into a flat base and removable plate to attach at a convenient
location on the outside metal surface of the downspout.
Here is one version in four easy steps.
1.Buy and modify a 6 inch by 6 inch PVC junction box from a local
hardware store.
2. Make an installation template from scrap plywood and attach to
the ailing downspout.
3. Cut your hole and clean out the clog.
4. Attach your new hatch cover with copious amounts of clear adhesive caulk
and an appropriate number of nuts and bolts.
Cut a railroad tie into a big piece and a little piece, cross lap the little piece and big piece
together to form an L support for an old car spring, attach a pivot bracket and 6 foot length of
1 inch square tube above the car spring, force the axe handle remnant into a 1 inch diameter
galvanized nipple and bolt axe assembly into the business end of the tube, make a box of sufficient
dimension to hold 5 standard red bricks and use U-bolts to attach the counterweight above the
axe head and voila! a beautiful backyard wood splitting tool modeled on some of the European
versions seen on the Internet will appear before your very eyes!
Now your mileage may vary but my cash layout for this little project was $12.00 to buy the
railroad tie from Home Depot, $2.00 to buy a 1 inch galvanized steel nipple, $11.00 for
miscellaneous u-bolts, lag bolts, washers and nuts etc. for a grand total of about $25.00
cash money USD!
The car spring came from my friendly local mechanic (Thanks Rocky!), the tube and bracket,
bricks, plywood etc. came from my junk pile and of course, the inspiration came from
the Internet (thanks Youtube!)
To quote the legendary George Peppard, Leader of the A Team: ” I love it when a plan comes together!”
Today, a nifty way to quickly repair a wide variety of small holes with the use of a
102mm hole saw and a plywood guide. 102 mm is just the right size to easily insert wooden
backer cleats. Remember to be sure to cut replacement drywall blanks the size of the
OUTSIDE diameter of the hole saw for a perfect patch.
To paraphrase the legendary Forrest Gump: punch lists are like a box of chocolates,
you never know what you will get when the telephone rings.
A staple of the Fixit Catalog Of Necessary Projects, punchlists are the jobs leftover
when the rest of the construction crew is gone and finished with their work.
Who knew parking space stripes could be too long and would need to be partially
erased? And yet there was the task on the job board list: black out excess parking
space stripes!
And so I did.
Enjoy.
ViviLnk
Work in progress. Layout lines and spacer set. Striper cart ready to roll.
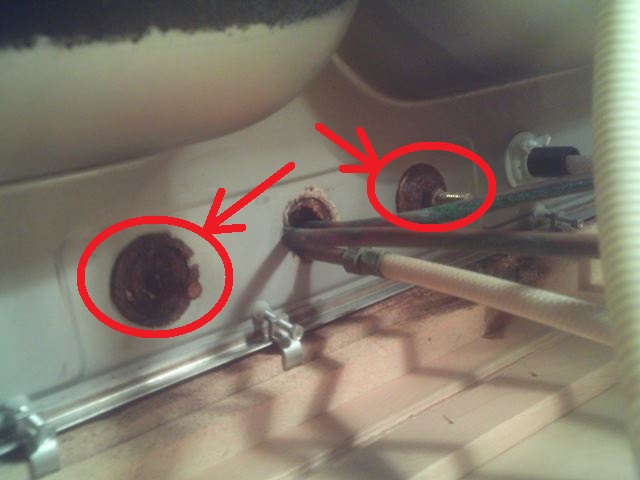
Warning! Shocking real life story about kitchen faucet replacement ( or why there is no
such thing as a simple job!) Not some showroom shiny parts kabuki theatre, but an
ACTUAL SINK with ACTUAL rusty flanges and rusty nuts and rusty bolts and an ACTUAL
oscillating multitool to cut them off! Probably the only such example on the ENTIRE
INTERNET! Never watch a prancing pony of pecuniary production parsimony demonstrate
a Fixit Job! For the real thing call a real FIXIT GUY!
Framed pictures and plaques suffer nicks and dings and other damage when they lean
against each other stored on a shelf or worse, stacked flat on top of each other in a pile.
With the variable length, width and thickness of a typical framed picture and
plaque collection storage and transport is an adventure at best.
One solution is to pack them vertically in individual partitions protected from
any potential injury.
This crate made with pegboard sidewalls and adjustable partitions created with
dowels solves many storage and transport requirements.